- Track maintenance costs for your ESBs and compare them to your conventional buses in terms of cost per mile (CPM).
- Track downtime of your ESBs and identify if you need additional service support.
How To Use This Planning Guide
This Electric School Bus (ESB) Planning Guide provides a step-by-step process for bus fleet electrification. Users can start at the beginning or dive into a specific step given their individual needs.
If you have questions or need assistance outside of the information provided here, the Joint Office of Energy and Transportation has partnered with the U.S. Environmental Protection Agency to provide FREE technical assistance to school bus fleets that are eligible to apply for Clean School Bus Program funds. To receive technical assistance, reach out to cleanschoolbusTA@nrel.gov or fill out the contact form.
Phase One: Learn
Overview: Learn
The first phase of this guide will introduce you to the basics of school bus electrification and help you prepare for phases two and three: scope and plan. The resources provided in this phase will help you:
- Understand the basics of electric school buses and charging
- Gauge organizational and community support
- Define your goals
- Identify and coordinate your team.
Step 1 - ESB Basics
Aside from the electric powertrain, ESBs are very similar to conventional buses. Fleets should select a model that meets their existing safety regulations, size, and other requirements. The video series Flipping the Switch: Electric School Bus Introduction contains helpful information on the basics of adopting ESBs. Major considerations unique to ESBs include:
Battery Size: ESB batteries are rated in kilowatt hours (kWh). Larger batteries will typically equate to increased range.
Range: Depending on the model, ESBs can travel up to 150 miles on a single charge. Range will be impacted by operator driving style, heating and cooling use, terrain, and payload. Driving ranges provided by manufacturers are usually calculated for ideal operating conditions.
Bus Efficiency: The bus battery size (kWh) divided by the range (miles). A lower kWh/mile value indicates a more efficient bus.
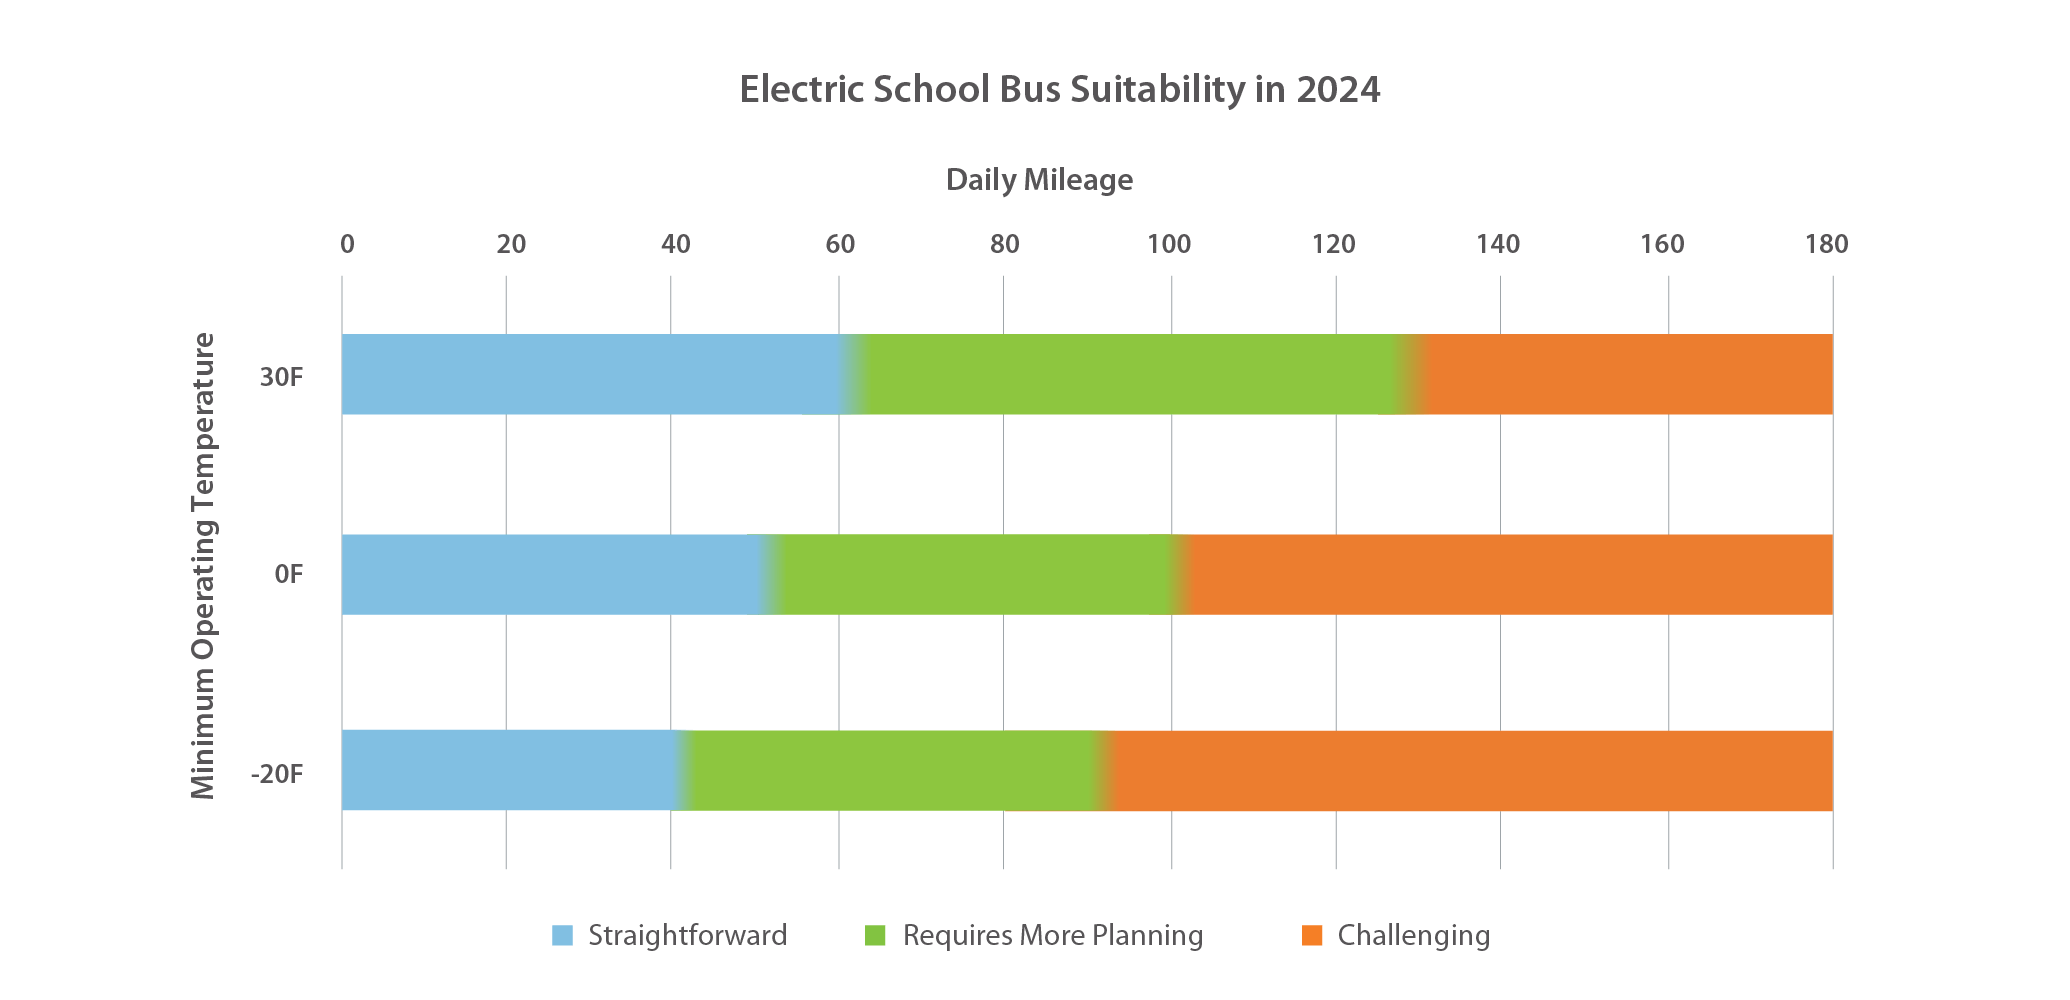
Effect on Range: Heating and cooling needs will impact vehicle range (especially heating). In extremely cold weather, heating needs can decrease range up to 50%. Discuss options with your bus manufacturer if you are concerned about extreme cold.
Comparison to Conventional Buses: ESBs require much less maintenance than conventional buses. Without oil changes or after-treatment systems, fleets can expect to see a reduction in routine maintenance costs.
Best Practices: Ensure your bus manufacturer has local options to provide warranty repairs and possibly routine maintenance, if required. Incorporating service-level agreements within procurement documents is also advised.
Comparison to Conventional Buses:The engine or powertrain warranty in conventional buses will be replaced with a traction motor and high-voltage battery warranty for ESBs.
Typical Warranty Length:High-voltage batteries are now being covered for up to 10 years with options for extended warranties. Confirm with your manufacturer what options are available.
Phase Two: Scope
Overview: Scope
This phase contains steps to conduct a preliminary bus electrification assessment with the goal of identifying some of the major elements of your project. During this phase you will:
- Define which routes can be electrified and where buses will charge
- Hold an initial discussion with your utility
- Identify funding sources and estimate costs
- Establish buy-in for your project.
Phase Three: Plan
Overview: Plan
The information in this phase will help you balance all the options and create the most efficient and cost-effective plan to meet your fleet’s needs.
During this phase you will:
- Identify specific routes, buses, and chargers that meet student transportation requirements
- Design your charging infrastructure and decide whether to incorporate charge management or other advanced charging methods
- Complete all site planning and onsite coordination with your utility
- Issue requests for proposals or enter into contracts for your buses and chargers.
Step 13 - Route Analysis
A detailed route analysis should evaluate route distances, dwell times, external temperatures, charging strategies, and battery parameters. This analysis should be done using assumptions about the least efficient operating conditions for the buses to prepare for days with poor weather conditions, inefficient driving, etc. The results will help you determine what bus configurations will work for your routes by providing information on energy usage by route, optimal bus battery sizes, and recommended charger power levels. A recording of the Fleet Planning and Route Analysis webinar from the U.S. Environmental Protection Agency’s (EPA) Clean School Bus Program provides more details on how to conduct a route analysis.
Step 14 - Charging Considerations
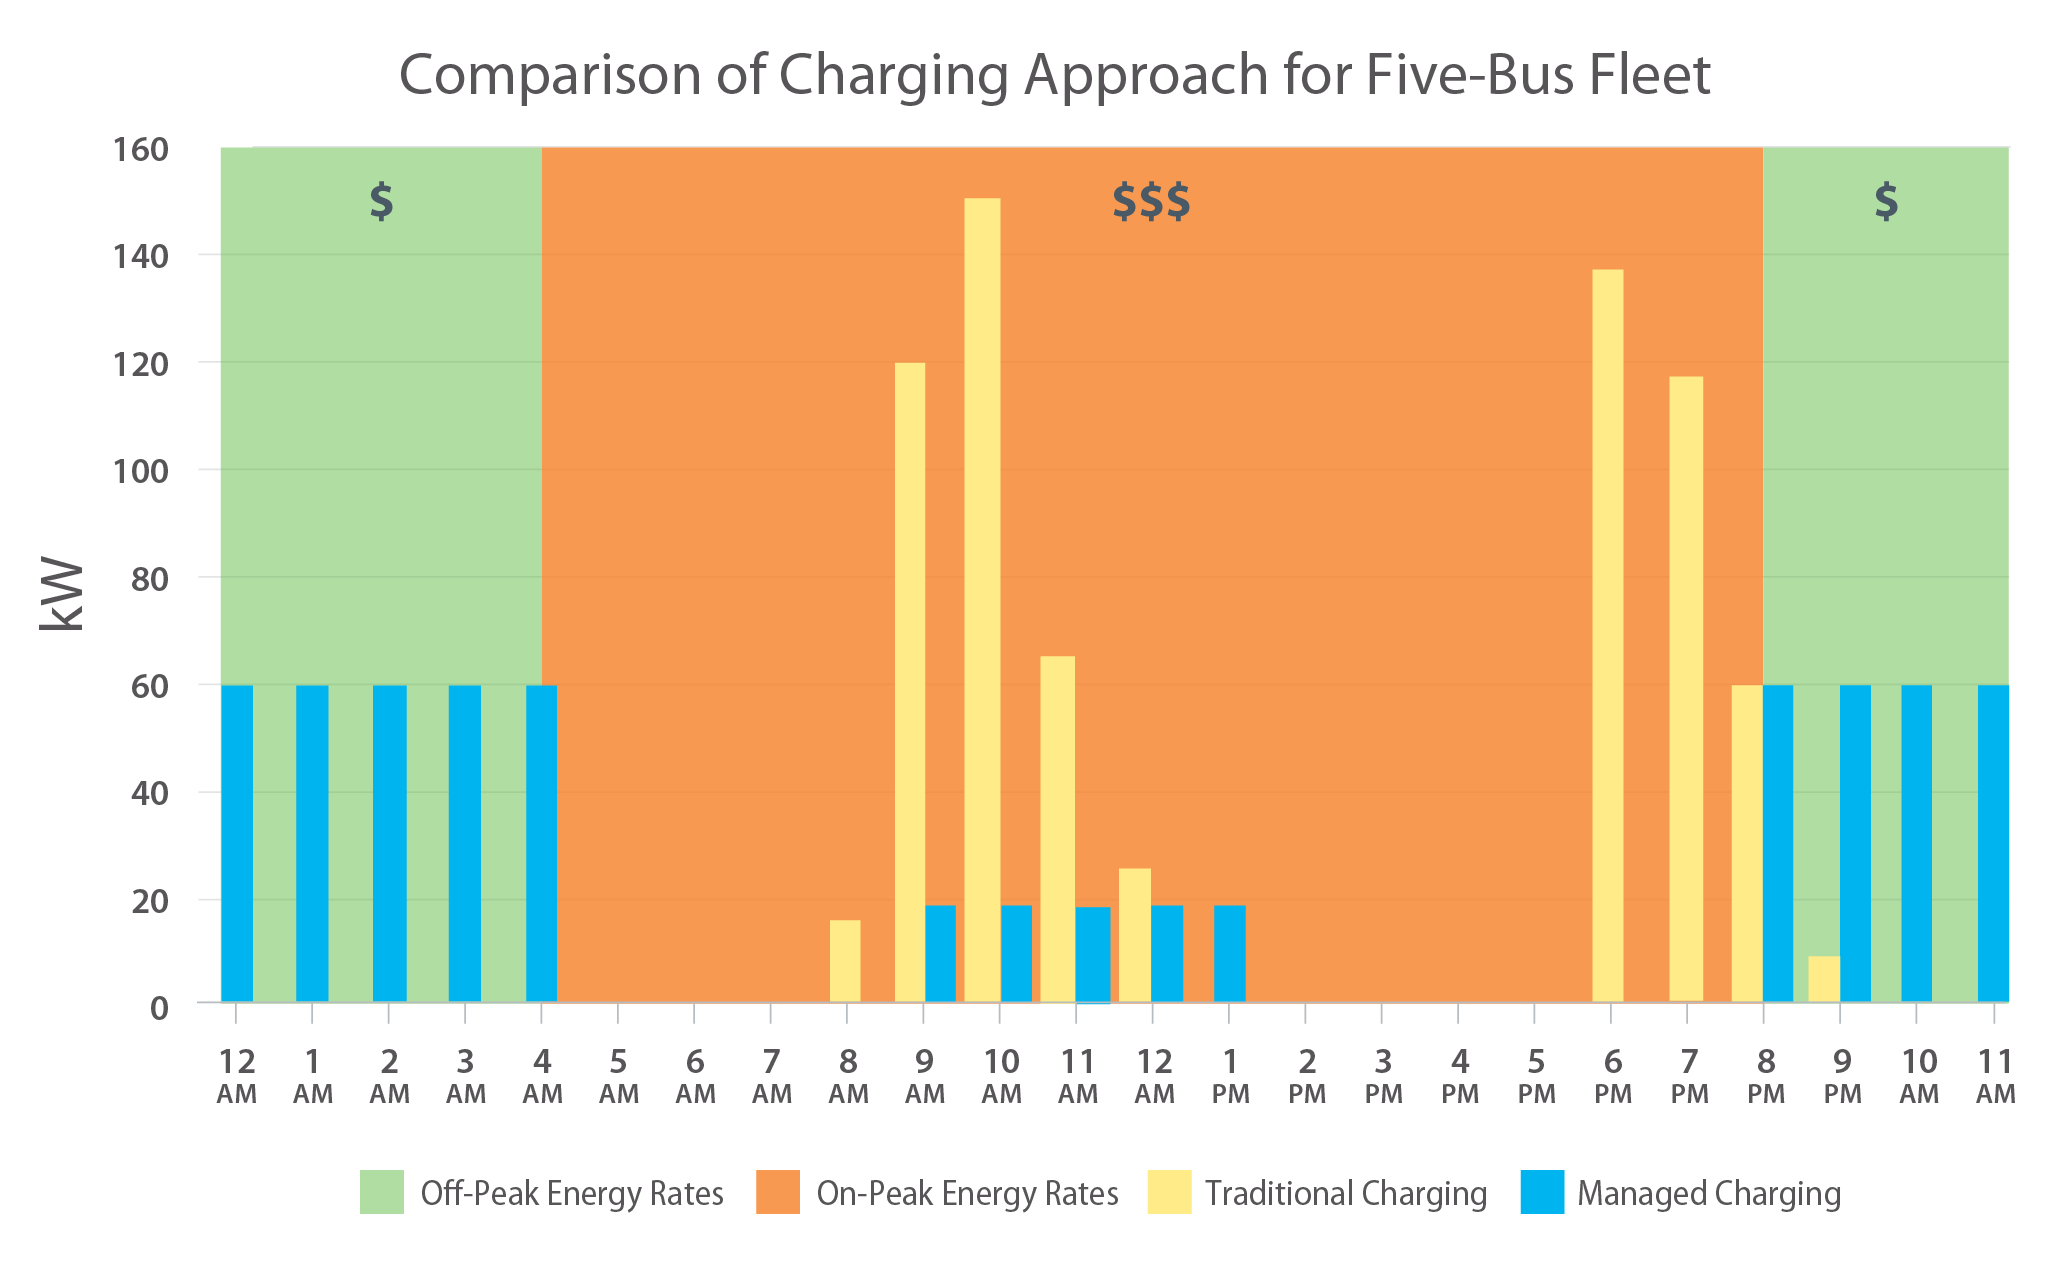
Evaluating your charging options begins with the three considerations below. At the very least districts need to ensure that their buses and chargers are compatible or interoperable with one another. Most districts will also want to consider some form of advanced charging like networked chargers or managed charging.
Managed charging is different from bidirectional (vehicle-to-grid) charging, which is a more advanced topic. If your utility will offer a program to compensate for bidirectional charging, more information is available in Phase Five: Step 25.
Step 15 - Utility Check-In
At this point, you should check in with your utility and confirm information from previous discussions or provide updates if your plans changed. During the discussion with the utility, you should:
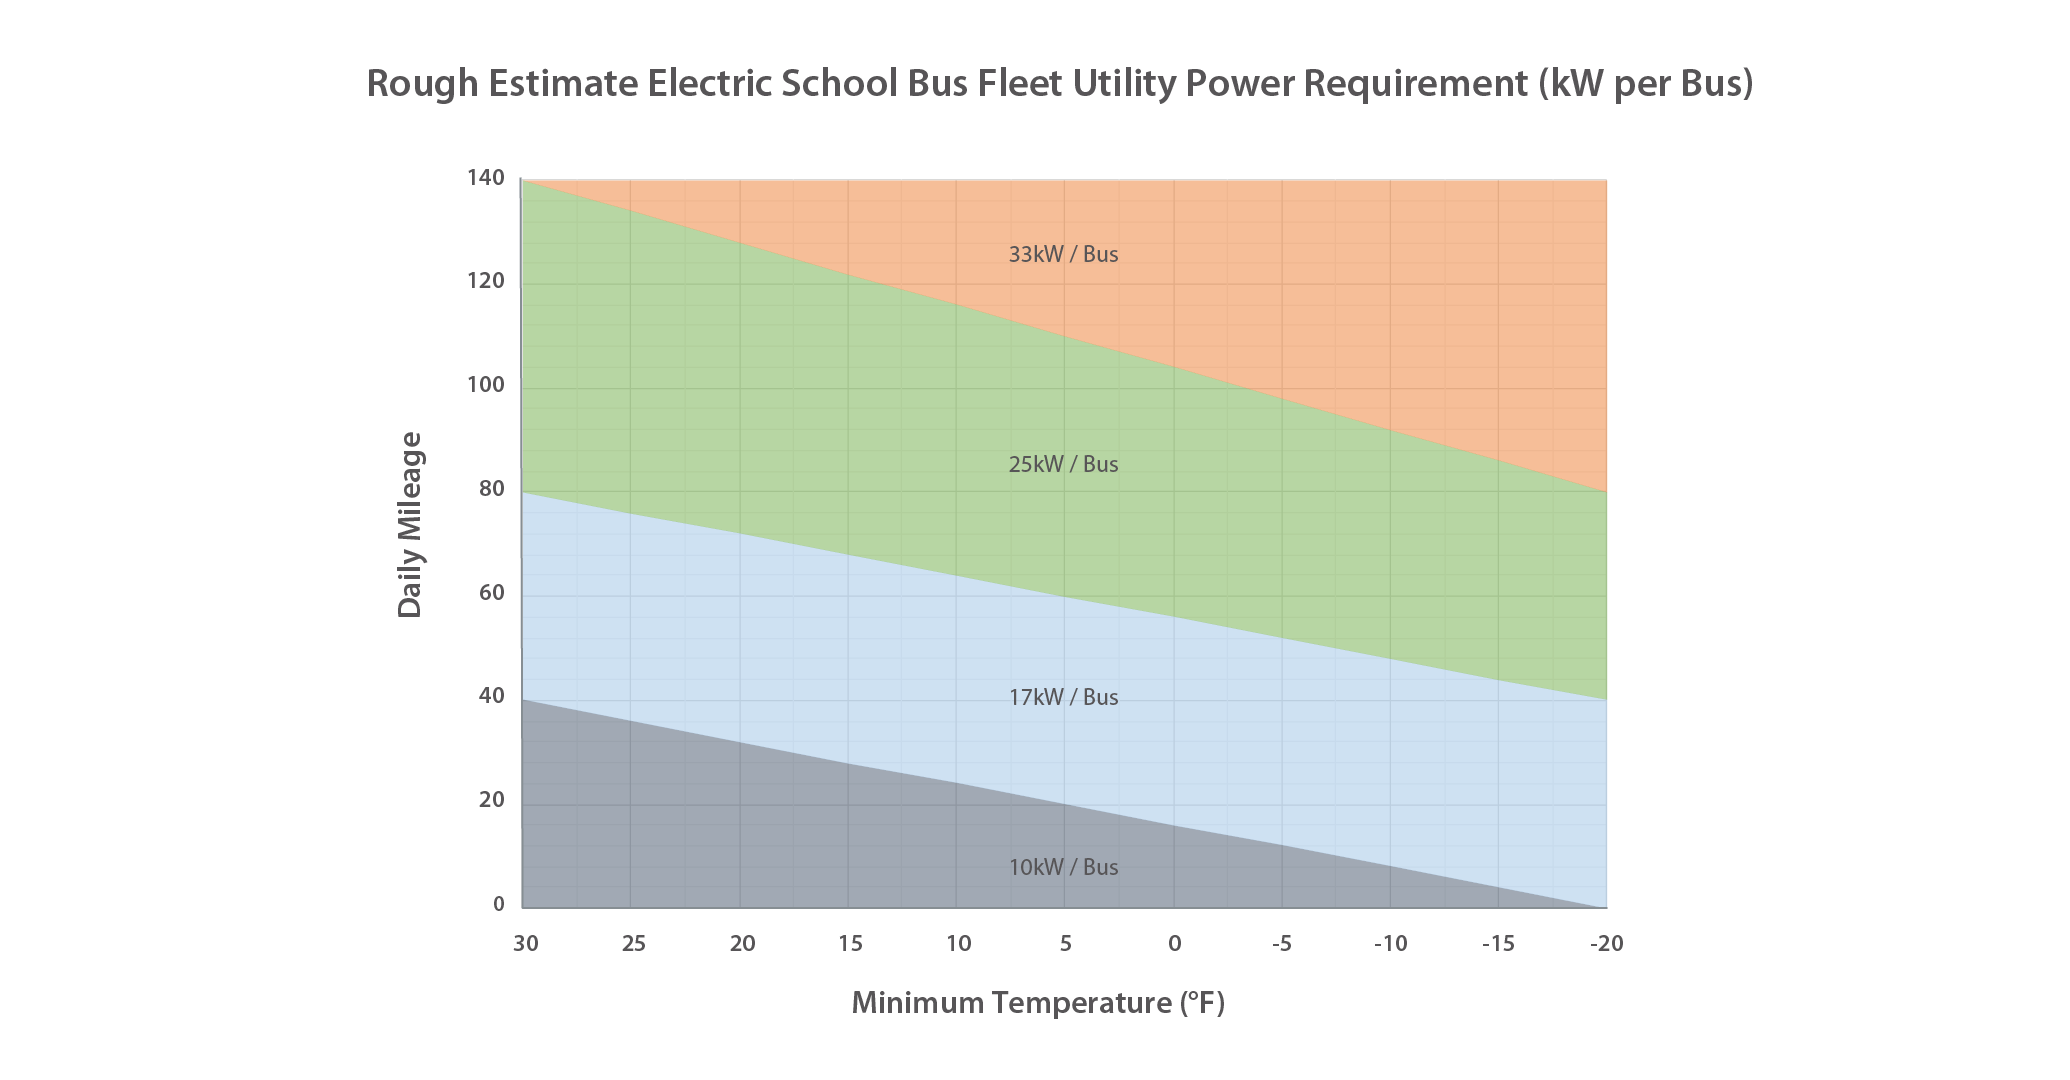
- Let the utility know the number and size of the chargers you are planning to install based on the results of your route analysis. Confirm if you will need a new service.
- Ask the utility if they provide onsite assessment services for customers. They may be able to help you identify optimal locations to place your charging infrastructure and save costs.
- Discuss any utility incentives or make-ready options that are available to your fleet.
- Some utilities have programs where they will pay for required upgrades or install and own charging infrastructure in exchange for a premium on your monthly bill. See examples in the ESBI Electric Vehicle Make-Ready Programs Guide.
- Smaller utilities may also be willing to listen to proposals that are mutually beneficial. Don’t hesitate to ask about incorporating new ideas or programs that are working for other utilities.
If a new service is required, you will need to follow established processes. Most utilities will not proceed further until you complete a new service request and submit engineering plans, which will require you to have your EV charging infrastructure contract in place. Options for charging infrastructure procurement are discussed in Step 17 of this phase.
Step 16 - Infrastructure Design
In Phase Two: Step 6, you identified potential locations where your buses could charge. Now you will refine your charging infrastructure plans to incorporate your additional findings from these planning activities.
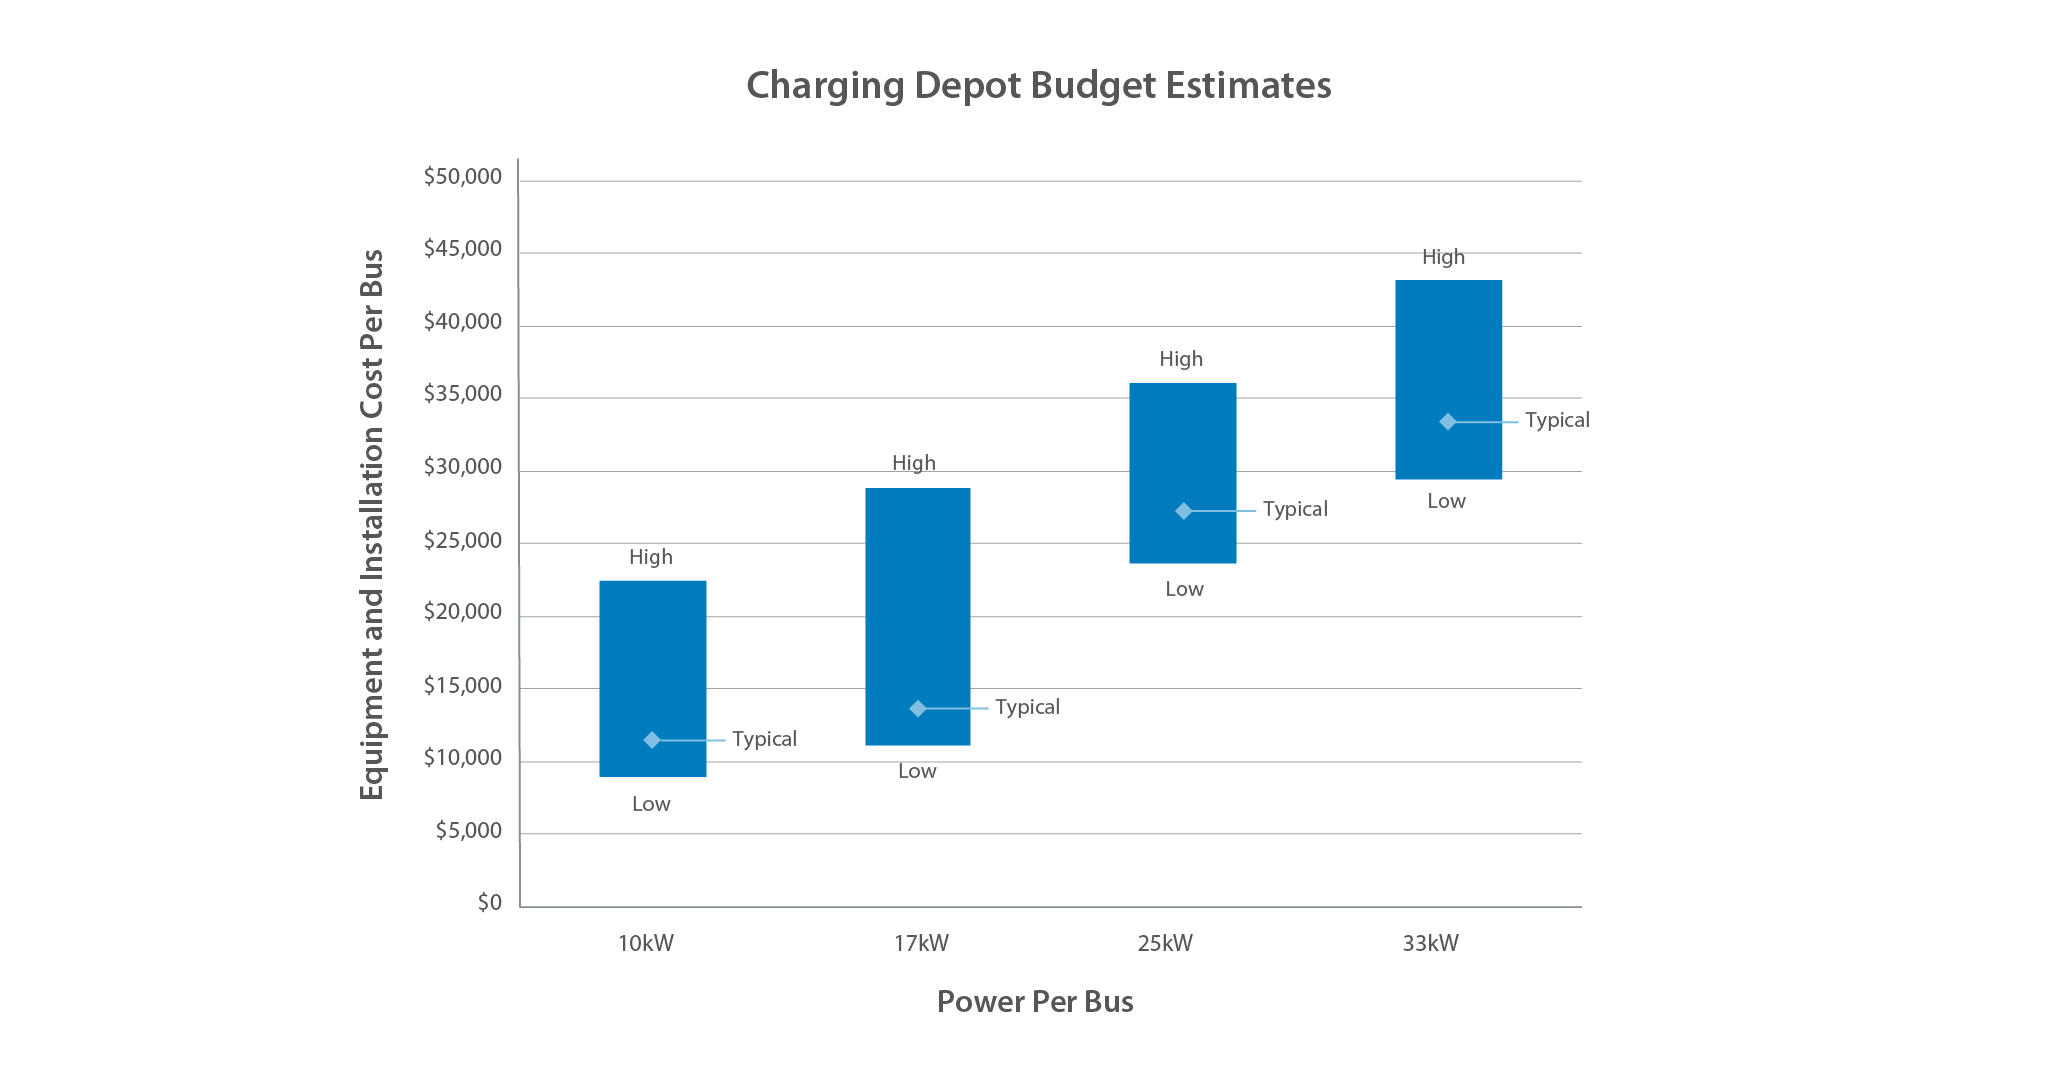
As you proceed with this step, you might find it challenging to weigh the costs and benefits of all the options. A business partner can help you navigate those considerations. If you do not already have a business partner, see Phase Three: Step 17 of this phase for potential vendors and methods to partner with them. This step can help inform the scope of work for your charging business partner or contractor. If you are planning without the help of a business partner, the ESB Facility Assessment Guide from VEIC contains in-depth processes to assess your facility and site your charging infrastructure.
There is no specific formula for creating the optimal site design. Below are the major items you will want to consider.
- Initial Site Layout
- Where is it easiest and least expensive to deploy your initial chargers?
- Are you limited by parking (pull-in/back-out) and do you need to require front or rear charging receptacles on your buses?
- Do you have space for chargers and bollards in and around parking spaces?
- Equipment Needs
- How many chargers and what kW and power level will you install?
- Have your confirmed interoperability between your buses and chargers?
- What mounting options and cable management do you require?
- Futureproofing
- Where will future ESBs charge?
- Is it cost effective to install conduit and stub ups during the initial installation?
- If you need a new service in the future, how will that be incorporated into site plans?
- How quickly will a new service be required and what are the costs and timelines?
- Network and Charge Management
- Do you require networked equipment?
- What elements of charge management do you require (see Phase Three: Step 14 of this phase)?
- Do you require remote monitoring of equipment?
- Do you require customized and/or real-time usage reporting?
- Training
- Do you require training on charger operation and maintenance?
- Maintenance
- Do you require a maintenance agreement with specific service level agreements, including response times?
- Are there regular maintenance procedures and if so, who will perform them?
Step 17 - Procurement
You are now ready to begin the procurement process for your ESBs and charging infrastructure. Depending on what method you choose, these could be separate or combined procurements. Either way, they will be highly dependent on one another and need to be done concurrently.
The three major points you should keep in mind are:
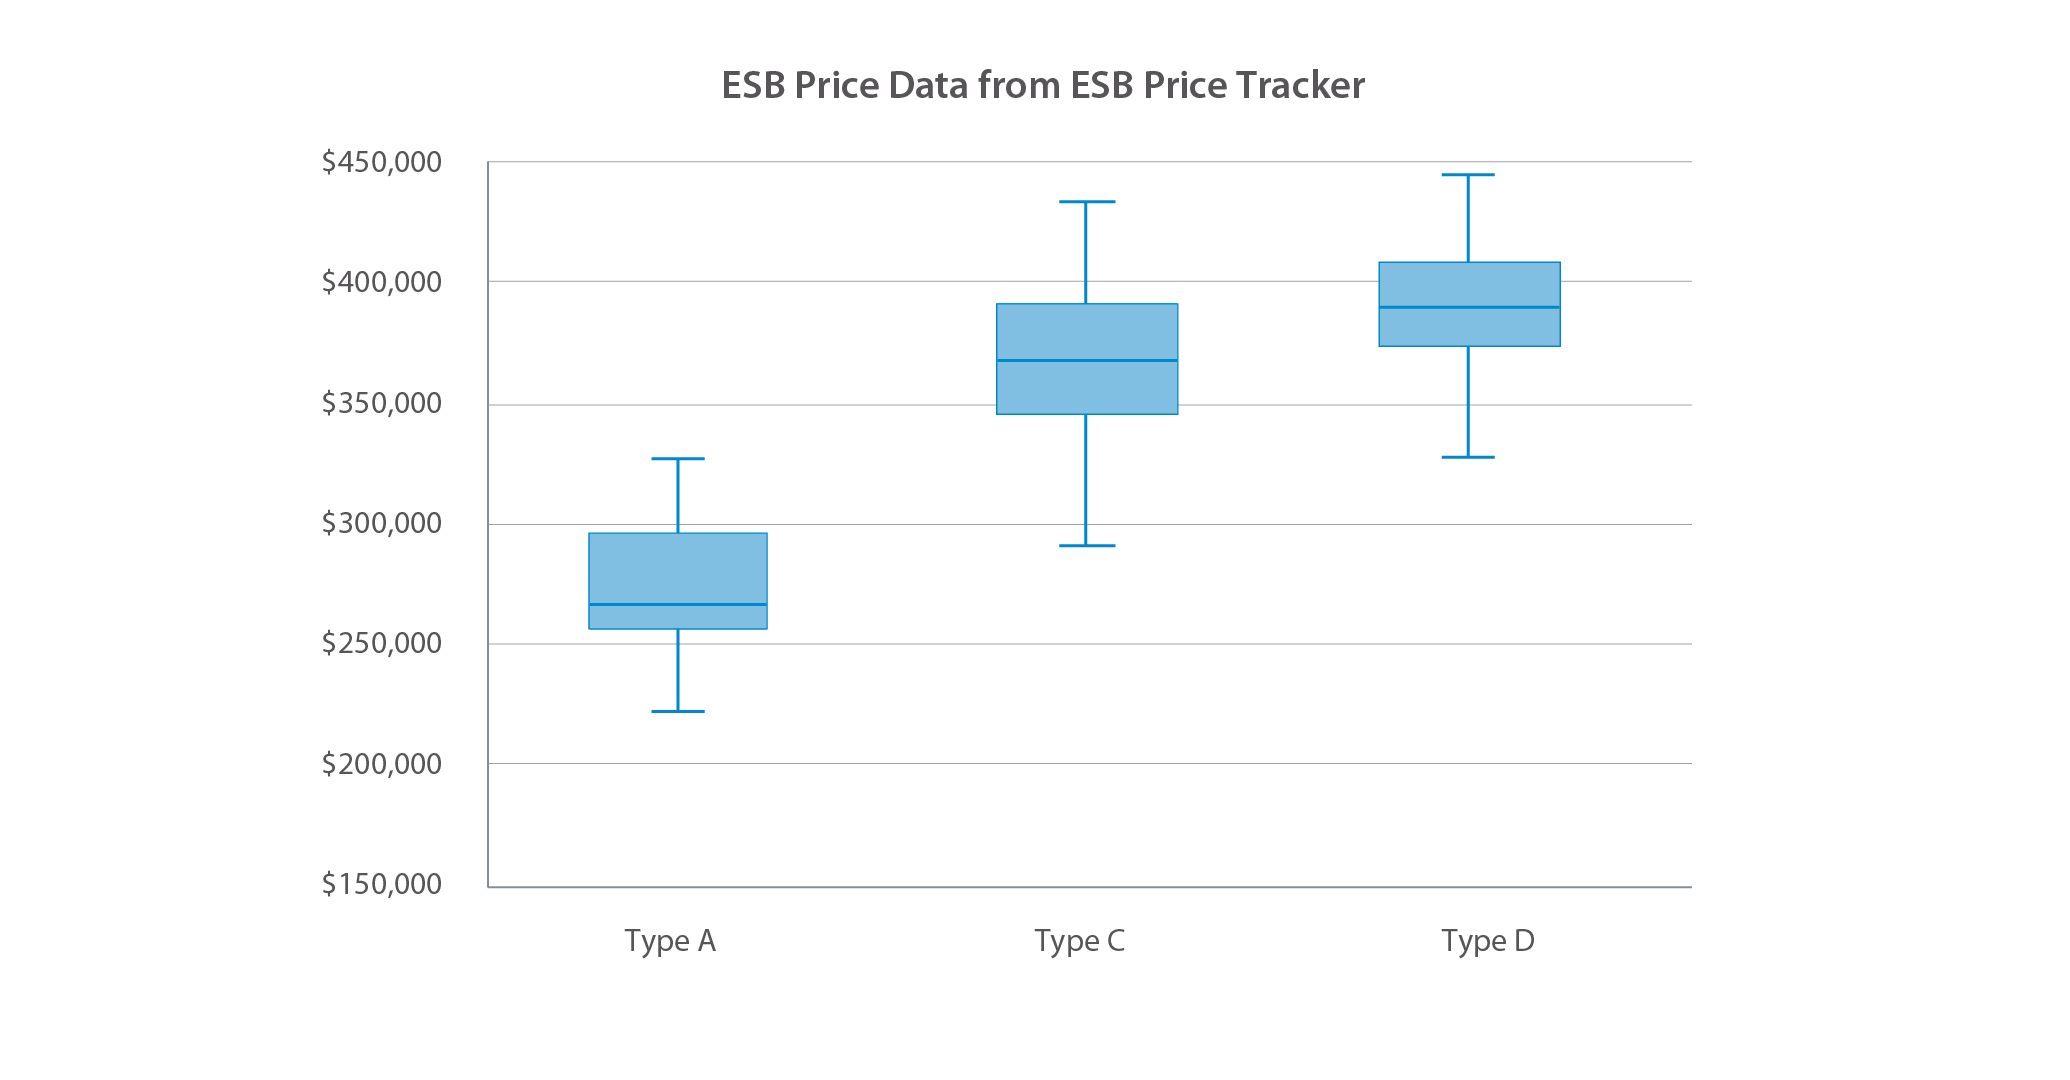
- Ensure you understand the complete costs for charging infrastructure before committing to bus procurement. At this point you have estimated infrastructure costs and you do not want to be surprised by additional costs after you have committed funds for an ESB.
- Ensure your bus model and chargers are compatible. This means the bus can receive the power level of the charger and it is interoperable, which can be confirmed by the charger manufacturer, bus manufacturer, or third-party software provider if you choose to utilize one.
- Ensure you understand your full timeline for charger acquisition and installation. This includes any required utility upgrades. Your chargers will need to be operational before deploying ESBs.
Step 18 - Utility Upgrades
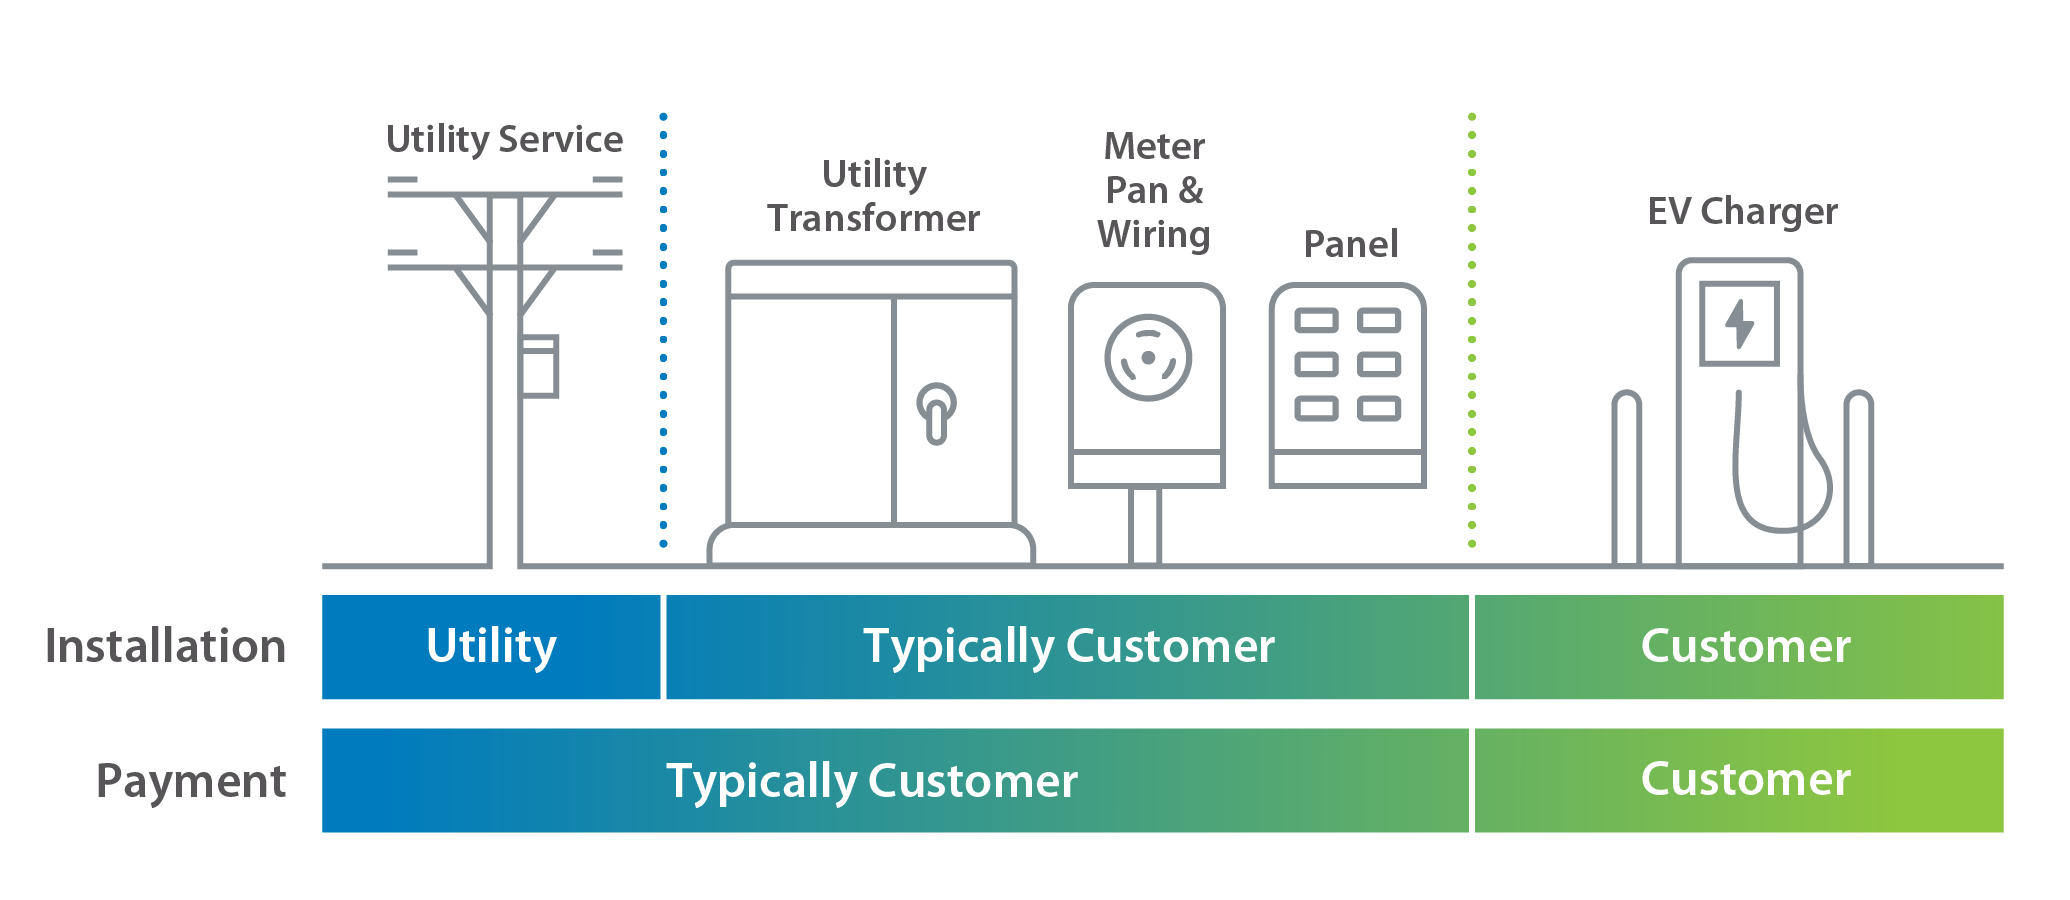
With a clear charging plan in place and a contractor on board, it’s time to start the formal process for a utility service upgrade or new service, if needed. This may also be the time to complete the paperwork for any other utility programs that you identified in Phase One: Step 6 or Phase Two: Step 10. A zoning permit and plot plan showing the proposed location of utility infrastructure also might be needed.
Some charging business partners may directly pay fees and utility construction costs and may manage applying for any special utility programs.
Typical New Utility Service Request Process
-

Submit Required Documentation
Your contractor works with you to submit required forms and engineering design documents to the utility. Pay a design fee to the utility.
-

Visit Site
The utility sends a representative to meet your contractor at the site.
-

Utility Provides Project Breakdown
The utility provides a design, price, and timeline for their portion of the work. The design clearly establishes the division of responsibilities between the utility and your contractor.
-

Secure Easements
If necessary, secure easement(s) for utility equipment.
-

Authorize New Service
You authorize the utility to begin work on the new service. Expect to pay all utility construction costs in advance.
-

Complete Site Work
Your contractor completes site work to the utility’s specifications.
-

Utility Completes Work
The utility completes its portion of the work.
-

Obtain Electrical Inspection
You obtain a municipal electrical inspection.
-

Utility Energizes New Service
The utility energizes the new service. Some utilities may require a deposit.
Address Future Needs Early
If you will need a new service based on future acquisition plans, begin the upgrade process early with your utility. Grid infrastructure upgrades can take years to complete.
Plan Resources
Phase Four: Implement
Overview: Implement
The implementation phase of the fleet electrification process could be the longest phase, depending on the timeline for bus delivery.
During this phase you will:
- Coordinate timelines for utility upgrades, permitting, charger installation, and ESB delivery
- Train staff who will be involved with ESBs
- Install and activate your chargers before your ESBs arrive
- Deploy your ESBs.
Step 19 - Coordinate Timelines
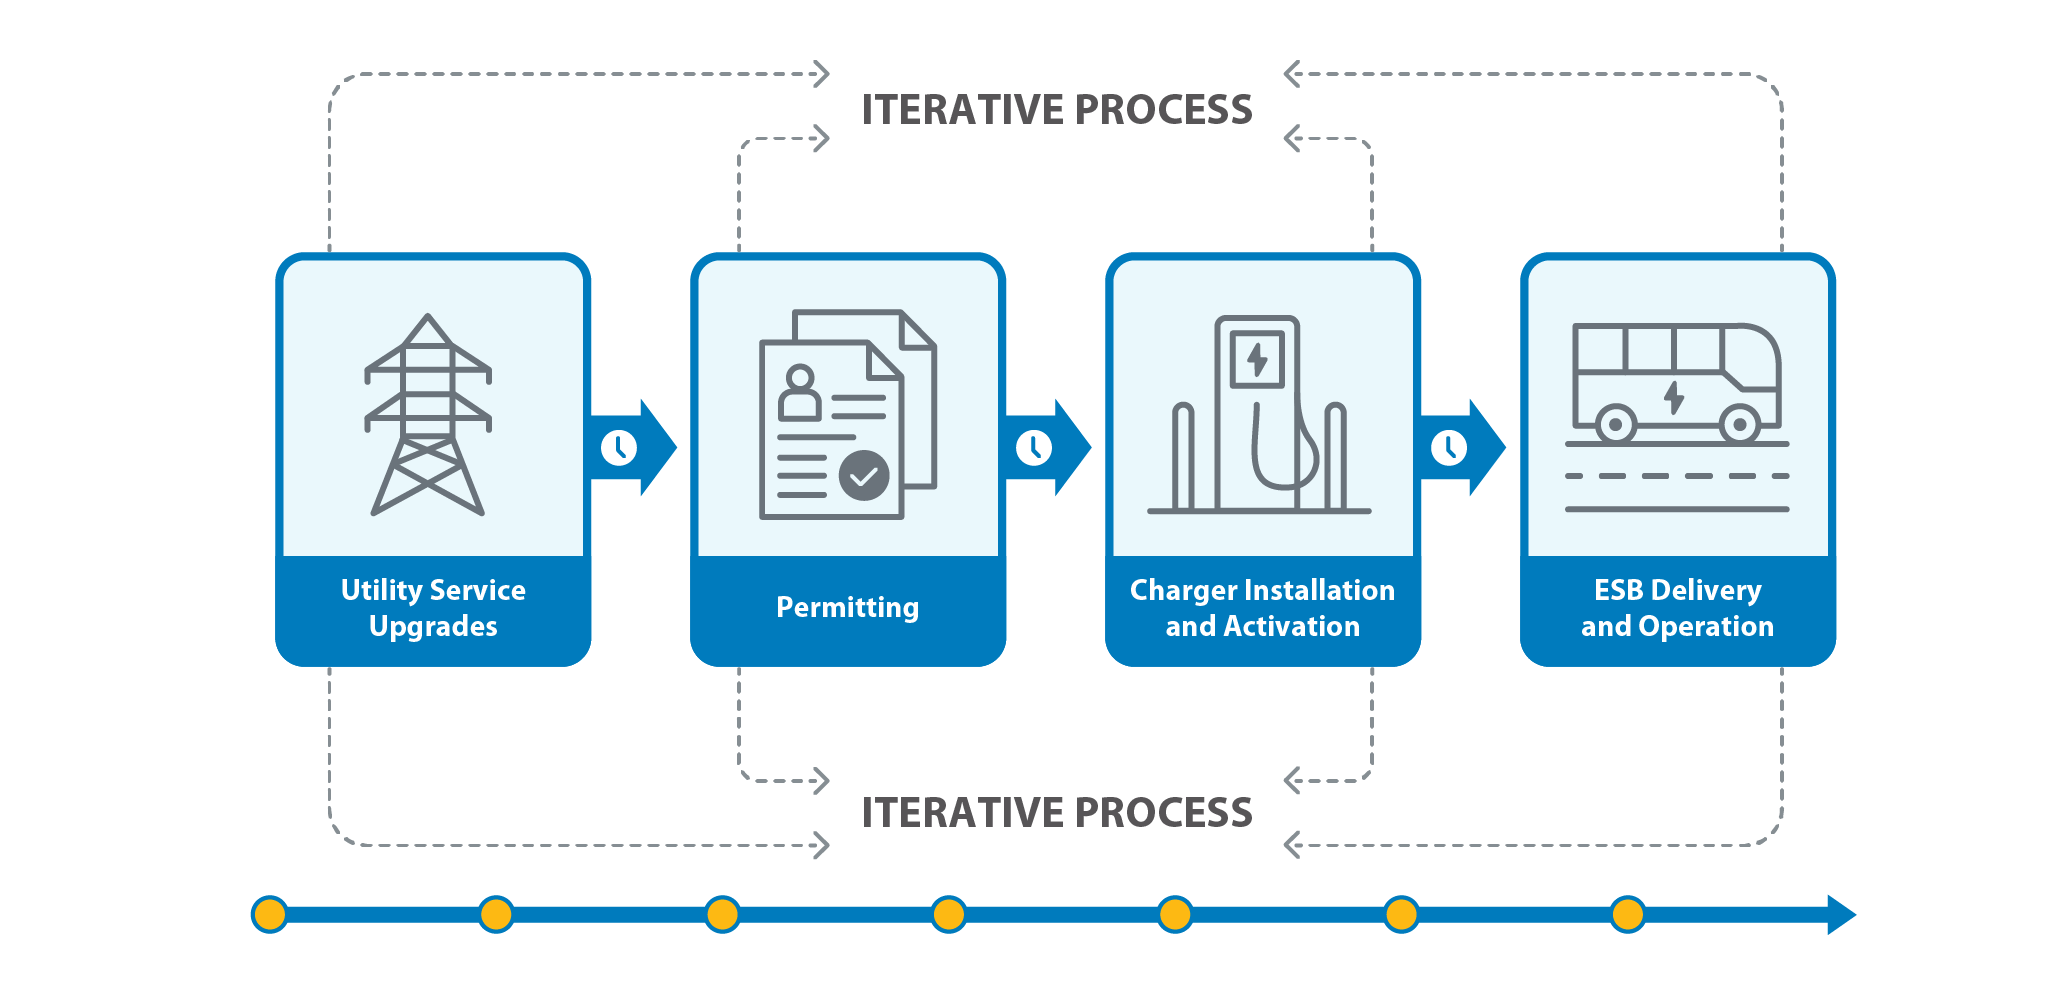
At this point you should clearly understand what will be required to install your charging infrastructure. You also should have started (and possibly completed) procuring chargers and ESBs. Now you need to ensure the charging infrastructure is in place and activated prior to bus delivery so the vehicles can be deployed as soon as possible.
Work with your partners to track the timelines of the four project components below. These steps might not be sequential, but rather an iterative process where you will revisit earlier steps as you progress through your plan.
Step 20 - Train Staff
Effective ESB deployment involves ensuring all key stakeholders are knowledgeable about and comfortable with ESBs and charging infrastructure. This step provides an overview of recommended training components and resources for each stakeholder type.
For resources on how to create an ESB workforce development program, utilize the U.S. Environmental Protection Agency’s (EPA) Workforce Planning Recommendations and Resources. This document outlines best practices, including performing a skills gap analysis with your staff to target training needs. An additional resource is the How to Develop a Training Plan and Where To Get Certified Training webinar from the EPA’s Clean School Bus Program.
Step 21 - Install and Activate Charging Infrastructure
Your charger provider will handle charger installation and activation. To keep the project moving and on time, you should understand the steps they need to take and hold regular check-ins.
Step 22 - Deploy ESBs
Upon receiving your ESBs, follow the tasks below in addition to your standard commissioning procedures like numbering, insurance, and safety inspections.
Phase Five: Improve
Overview: Improve
Your ESBs are on the road and now it is time to evaluate their operation and maximize performance. During this phase you will:
During this phase you will:
- Develop a plan for community and student engagement
- Evaluate how your buses, chargers, and drivers are performing and identify areas to improve
- Identify if advanced technologies are right for your fleet—these could include solar and battery storage or vehicle-to-everything (V2X), also known as bidirectional charging
- Consider end-of-life options for the ESB high-voltage batteries.
Step 23 - Community and Student Involvement
Phase One: Step 4 introduced the importance of having the support of your organization and the wider community. Once buses are on the road and the fleet is familiar and confident in their capabilities, continue involving students and community members to help ensure long-term support and buy-in for ESBs.
Step 24 - Evaluate Performance
Gathering ESB operation data is essential for optimizing their performance and informing future deployments. If you are utilizing networked charging or telematics, your provider may be able to generate customized reports, or you can create a tracking spreadsheet. For help organizing or interpreting data, contact the clean school bus technical assistance team at the Joint Office of Energy and Transportation. The Beaverton School District in Oregon has developed a website on their Environmental Efforts website that also provides an example for how to track ESB performance data.
Step 25 - Investigate Advanced Technologies
Charge management is usually the simplest advanced technology to implement and often provides the most cost savings. If you are not using charge management, review Phase Three: Step 14. Other strategies for consideration are discussed below.
Step 26 - Battery End-of-Life
High-voltage batteries should last the life of your bus, and most are now warrantied for 8–12 years. Bus fleets have some options about what can be done at battery end-of-life. Start considering this during bus procurement when your OEM or dealer may take ownership of the process and provide transportation, disassembly, repurchasing, or value assessment.
Disposal in a landfill is not an option for lithium-ion batteries because they pose a risk of fire and release of toxic materials to the environment. The two options at end-of-life are:

